
In 2022 I started my homelab journey. Finally in 2023 I reached a point where I’m happy with my setup and I’m ready to share it with the world. This post is meant to fossilize its current state and to talk about some of the decisions I made along the way.
Why#
Over the past few years I’ve been collecting old laptops and phones whenever someone in my family gets an upgrade. Those “old” laptops are still perfectly good machines with 8GB RAM each + some storage. If I just straight added up each computer’s RAM, I’d have 24GB at this point, which is more than enough to run a few VMs and self hosted services.
Around this time I also began to become more aware of the privacy implications of using cloud services. I think that it’s important to be aware of what data you’re giving away and to whom. Recently there have been some awesome FOSS projects which claim to match the functionality of their cloud counterparts, easily self hostable with docker, which I would really like to try out. I also wanted to learn more about networking and Linux administration, and what better way to do that than to build a homelab?
The Dream#
It’s important to have design goals when building a homelab. Some really only want a NAS to keep their important data like family photos on. Others want to run a Minecraft server for their friends. I want hosted cloud independence, that is to say I want to be able to host my own services that I would otherwise use a cloud service for. And I want a framework that is flexible enough to allow me to experiment with new services and technologies easily. So let’s talk more specifically about these goals.
Repurpose old hardware#
As I already mentioned, I have a lot of old hardware lying around which I think is useful enough. Ideally I want a solution that can horizontally scale across these devices I already have. And related to this goal is that I am a College student (High School at the start of this journey), so I want to spend $0 (or as close to it) in total to get this up and running. This is largely the reason why my homelab does not have a NAS component to it, because that would require me to buy hard drives (or SSDs) and an enclosure.
Secure access#
I don’t want to expose my public home IP address to the world by pointing my domain at it. I also know I will have admin dashboards and some services which I want only exposed through a VPN, and not to the public internet. For example (and as we will see later), I have a self hosted Bitwarden accessible only within my VPN which I can access anywhere around the world, also from my phone, and without needing to juggle with self signed certificates 🤯
Observability#
If anything goes wrong, I want to have a pleasant experience debugging what happened. Also, I know I’ll be running potentially 20+ services so I want dashboards to get quick overviews of everything that’s going on. I’ve heard good things about Prometheus which aggregates the logs in a time series database and Grafana which helps you visualize dashboard easily and beautifully. I also want a solution to be able to look at logs easily and to be able to search through them, although I think most of the time this is handle by default from services printing to stdout/stderr.
Gitops and Time to new service (TTNS?)#
All of these fancy ingress options and observability hooks should be handled automatically. I want to, with a single easy-to-read configuration file checked into git, be able to:
- Edit (and add) relevant DNS records
- Provision SSL certificates (if http)
- Expose the service to the public internet, or to my internal VPN
- Preserve IP address all the way to the service (no internal
10.0.0.0/16addresses showing up in logs) - Hook into service provided endpoints (like
/healthor/metrics) for observability and get notified when things go wrong
Open Source#
Maybe the most important of all for me. A big part of this is about cloud independence and data freedom. And frankly you cannot trust proprietary software, especially if it is connected to the internet (homelabs…are obviously connected to the internet). Fortunately, most self hosted software follows a similar ethos but it does pull me away from OS choices like Unraid and some networking equipment like Ubiquity.
The beginning: a VPS#
I knew that I did not want to expose my home IP. And also being new to system administration I wanted to start with something simple, even if my dream requirements were not met. I wanted to move away from Google services as quickly as possible, and learn some skills along the way. So I rented a 3 vCPU, 4 GB RAM, 80 GB SSD VPS from Hetzner for 7.05€/month (I’m not sure that this plan is available anymore, but they have good prices in general). On it, I hosted Nextcloud AIO which was a really simple, one command docker deployment of Nextcloud. Nextcloud has an online Calendar and Contacts which sync with CalDAV and CardDAV to your phone. It has simple markdown notes and a companion mobile app for syncing. It also stores files with an online file manager that integrates with ONLYOFFICE or Collabora Office for online .docx and .xlsx editing. The mobile app has automatic file upload support for pictures and videos so backing up my data is easy. I also trust the reliability of a VPS to not lose data from hard drive failure, so it is a safe backup location for my important files. In total, Nextcloud really is an awesome Google Drive killer.
I also hosted a second VPS which was a simple docker compose. It used traefik as a reverse proxy with very nice automatic HTTPS with Let’s Encrypt. Behind it was a publicly exposed Vaultwarden instance (which is a Bitwarden compatible self hostable server with some of the premium features built in (and also written in Rust)). I also notably hosted a SearXNG instance for great private search results.
This setup was good for a while, but it didn’t really meet my dream criteria. I was not using my own hardware, my Bitwarden instance was public, and I had no metrics. I did choose open source software to host so I was happy about that.
However there was a major issue for my personal data. It is easily possible for my VPS provider to just read the contents on disk. Or if they were feeling fancy they could read the RAM in flight. They don’t claim to but at the end of the day they are in control of the hardware (well, virtual machine), and not me. This is clearly a very paranoid way of thinking. But I think this is an aspect of self hosting not frequently touched upon, where people recommend “self hosting” on a VPS. Is it better than using a managed service like Google for your calendar? Absolutely. But it’s not the same as hosting on your own hardware.
Moving to a local homelab#
At this point I was starting to feel more comfortable with Linux system administration and Docker. So I began shopping for solutions to see what would fit my own criteria.
Choosing an Operating System#
First up is how I want to manage my operating system. And I don’t mean Debian vs Fedora, necessarily, but things like Ansible or Kubernetes count too. The big areas I am concerned about are:
- GitOps, managing everything through Git and having a single source of truth in plain text and a declarative fashion
- Horizontal Scalability, being able to easily add more hardware to my homelab and have it automatically join the cluster
TrueNAS#
This a more NAS focused operating system as the name suggests. It lets you set up NFS and SMB shares with a nice web UI. TrueNAS Scale has a good selection of builtin apps running in containers. The issue is that it is not managed through configuration files that can be checked into git, it is a web UI only. Adding more apps seems to not be easily possible, even though it’s just running kubernetes under the hood. Configuring ingress to my special use case also doesn’t seem possible. There is no option for joining the clusters of apps to scale dynamically to the best node either (in case of a failure or upgrade). Also, each machine running bare metal TrueNAS needs to have 2 drives, one for the OS and one for the data. I think this is a good choice if you have one dedicated NAS machine, but not for my use case.
Ansible#
Ansible is a flexible configuration management system. It’s basically a declarative alternative to managing a load of bash scripts. I feel like I should have spent more time looking into Ansible but I think I just skill issued really hard here. Something about it didn’t feel right, that I can’t really explain. It’s written in Python and I have a fear of Traceback (most recent call last):. It doesn’t feel built to decide where to place each service, and pooling the storage of each node together also doesn’t seem to be possible. I wouldn’t let this detract you from trying out Ansible though.
Kubernetes#
It’s quite possible that you’ve been able to guess this. Kubernetes is a powerful and confusing container orchestration. It pretty much checks all of my boxes.
- It’s declarative, you define the things you want in code and it makes it happen
- It’s horizontally scalable, you can add more nodes to the cluster and it will automatically distribute the load
- Many plugins exist like cert-manager which provision SSL certificates automatically, and ExternalDNS which can update DNS records automatically
- It’s open source, and it’s the industry standard for container orchestration
- Storage solutions like Longhorn pool and replicate storage automatically
- You can put it on your resume (wait this one wasn’t one of the criteria?!?)
The only problem is that it is very complicated with a lot of moving parts. Cloud providers like AWS give you EKS which handle a large amount of the complexity for you. On-prem Kubernetes is even more involved. But challenge accepted!
I used the K3S Kubernetes distribution. It’s a lightweight distribution perfect for my smaller nodes. I set up ArgoCD for GitOps, which reads from my git repo and applies changes automatically on push. Then Longhorn for storage. Ingress is a huge topic and also the next section so I’ll see you there 👋
Ingress#
Ingress is the process of exposing a service to the internet. This is typically done by pointing a domain name to an IP address (an A record for IPv4 or AAAA record for IPv6). I find that a lot of tutorials and guides on self hosting gloss over this part, leaving SSL certificates and other magic as an afterthought. So lets talk about it and some of the evolution of ingress into my homelab.
127.0.0.1#
Like I already mentioned, I don’t want to directly expose my public IP address or deal with any kind of port forwarding. Some people do this and have success with a simple dynamic DNS service like Duck DNS but for me this is a no go.
Public ingress with Cloudflare Tunnel#
I discovered Cloudflare Tunnel which is a free (as in beer) service that allows you to expose your services to the internet, completely behind a NAT and firewall. It’s very easy to set up too. Here’s an example configuration file
ingress:
  # Rules map traffic from a hostname to a local service:
  - hostname: example.com
    service: https://localhost:8000
  # Rules can match the request's path to a regular expression:
  - hostname: static.example.com
    path: \.(jpg|png|css|js)$
    service: https://localhost:8001
  # Rules can match the request's hostname to a wildcard character:
  - hostname: "*.example.com"
    service: https://localhost:8002
  # An example of a catch-all rule:
  - service: https://localhost:8003
They allow any TCP ports too which is neat, but no UDP so you won’t be wireguarding through it. Cloudflare Tunnel is really optimized for HTTP content websites though (like this blog), and according to their terms their free plan should not be used for serving a lot of media like photos or videos, so hosting something like Nextcloud would be a little bit of a gray area.
Cloudflare reserves the right to disable or limit your access to or use of the CDN, or to limit your End Users’ access to certain of your resources through the CDN, if you use or are suspected of using the CDN without such Paid Services to serve video or a disproportionate percentage of pictures, audio files, or other large files.
Overall for a single user, I think Cloudflare Tunnel is a great solution. However keep in mind the vendor lock in of using Cloudflare. No one else offers this kind of service to my knowledge so if you get more traffic than expected, you will have to pay or get kicked off. Also, by using Cloudflare in general you can be more secure but you will also contribute to the growing consolidation of internet traffic through a single company. Weigh the pros and cons for yourself.
For me, I started out with Cloudflare Tunnel but I have since moved to a self hosted (and more interesting) solution.
Edit 2025-07-03: Cloudflare Tunnels do not in fact support arbitrary TCP port forwarding to a domain, they are HTTP only. It does make sense if you think about it, HTTP has a Host: header which lets you proxy to the right place. Arbitrary TCP ports would mean they effectively have to give you your own private IPv4 address, which considering that the service is free, obviously can’t work. Perhaps if everything used SNI, an extension of TLS which gives any TCP service both encryption and a hostname, then routing could use that hostname behind a single IP. However we do not live in that world.
VPN and private ingress#
Let’s take a minute to step away from public ingress and talk about the private ingress I want to my Bitwarden and admin dashboards. For access from anywhere to anywhere I really like Tailscale. It is a mesh network which connects together all of your devices (including mobile). It’s really easy to set up and free to use. Now, the client is open source, but the servers are not. At first this seems like a contradiction to my open source requirement, but I think it’s okay. The servers are facilitating the data transfer, and only relaying encrypted data. We know for sure that the encryption is good because the client is open source. So we basically can use their servers for free to connect devices that are both behind NATs. In general the networking layer is inherently unfree, because your packets are probably being routed through a bunch of proprietary routers and switches anyways. As long as everything is properly encrypted it doesn’t matter. I think this is a good trade off.
So how do we set up Tailscale to get ingress into the cluster? Basically, in Kubernetes, every service gets a DNS name (a service is what links a set of ports to a pod (and a pod is a container, more or less)). So if I have a service called longhorn in the default namespace, I can access it at longhorn.default.svc.cluster.local. There are also automatic search domains for each namespace. So if I try to curl longhorn from within another pod in the default namespace, it will automatically resolve to longhorn.default.svc.cluster.local. So what I do is use ingress-nginx which is the de facto standard for ingress in Kubernetes, and add another pod in the namespace for tailscale. Then I use tailscale in proxy mode by setting the TS_DEST_IP environment variable to ingress-nginx-private-controller, which is the service for my private ingress controller. Now, any packets that hit the tailscale pod will be forwarded to the ingress controller, which will then route the packets to the correct service.
The tailscale pod in the cluster is reachable by any device within my tailnet by its tailscale IP address. So I set up a DNS record for private-relay.mbund.org to point to 100.104.19.77 which is the internal IP address of the tailscale pod. This IP will fail to resolve for anyone not in my tailnet, so it’s fine to leave it public. Now, for services like Longhorn’s dashboard, I can set up a CNAME record for longhorn.mbund.org to point to private-relay.mbund.org. This part can be automated by ExternalDNS which I mentioned earlier. For SSL certificates, I set up cert-manager to provision them automatically from Let’s Encrypt. Normally, Let’s Encrypt has you put a file on http://<YOUR_DOMAIN>/.well-known/acme-challenge/<TOKEN>, then their servers check it. Since everything is behind my VPN, that obviously cannot happen. Instead, we can do a DNS-01 challenge, which has you put a TXT record on _acme-challenge.<YOUR_DOMAIN> which their servers then check for. We have an api token for our DNS provider to work with ExternalDNS anyways so its not even that much more work. Now we have everything we need to make our ingress.
Here is an example ingress configuration for the Longhorn admin dashboard, accessible only to me at longhorn.mbund.org:
apiVersion: networking.k8s.io/v1
kind: Ingress
metadata:
  name: longhorn
  annotations:
    cert-manager.io/cluster-issuer: letsencrypt-prod
    external-dns.alpha.kubernetes.io/target: private-relay.mbund.org
spec:
  ingressClassName: private
  rules:
    - host: &host longhorn.mbund.org
      http:
        paths:
          - backend:
              service:
                name: longhorn-frontend
                port:
                  number: 80
            path: /
            pathType: Prefix
  tls:
    - secretName: longhorn-tls-certificate
      hosts:
        - *host
And that’s it! I think its pretty easy to read. It sets up longhorn.mbund.org to be available only to my private ingress class, and it should be routed to port 80 (HTTP) on the longhorn-frontend service. It also sets up a TLS certificate for the domain.
Relay#
So now for public ingress I can do basically the same thing. I set up a relay server on a VPS which has a public IP address. I installed tailscale on the box and set up HAProxy to accept port 443 (HTTPS), and use the proxy protocol (send-proxy-v2) to forward the packets to the tailscale pod in the cluster. Then I set up an A record for relay.mbund.org to point to the public IP address of the VPS. The proxy protocol preserves the IP address of the host, but still at Layer 4 (TCP). This way, I get the correct IP addresses but I’m terminating SSL within my cluster and on my own hardware. The relay is a dummy server, it doesn’t do anything except forward packets and as long as the session is encrypted, the VPS has no way of knowing the contents of the packets.
So now to expose a service to the internet, I only need to write an ingress configuration like this. (I’m using Longhorn as an example again to show the differences better, I would never expose this dashboard to the public internet):
apiVersion: networking.k8s.io/v1
kind: Ingress
metadata:
  name: longhorn
  annotations:
    cert-manager.io/cluster-issuer: letsencrypt-prod
    external-dns.alpha.kubernetes.io/target: relay.mbund.org # <-- this is different
spec:
  ingressClassName: public # <-- this is different
  rules:
    - host: &host longhorn.mbund.org
      http:
        paths:
          - backend:
              service:
                name: longhorn-frontend
                port:
                  number: 80
            path: /
            pathType: Prefix
  tls:
    - secretName: longhorn-tls-certificate
      hosts:
        - *host
Now we have public ingress too!
Observability#
I used Prometheus and Grafana as I had planned. There is an excellent Helm chart available to do basically everything for you. It actually highlights another feature of Kubernetes that I didn’t mention earlier, which is Helm. Helm is a package manager for Kubernetes, and since Kubernetes deployments are so common, there are first-party Helm charts available for most projects. This is a huge time saver because you don’t have to configure all of the Kubernetes resources yourself, you just have to fill in some values in a values.yaml file, most of which are specific configuration for the project and not fiddling with ports and pods and metrics and all that nonsense.
This Prometheus and Grafana chart lets installs CRDs (Custom Resource Definitions) into the cluster for metrics. What that means in English is that charts can define where Prometheus should scrape (with HTTP requests) the /metrics or whatever app specific endpoint there is.
With Grafana you can set up alerts to notify you when things go wrong. In addition to this I also use Uptime Kuma to monitor resources outside of my cluster (like the relay). I get alerts through a webhook to a private Matrix room with my main account and a bot account.
Anyways, here’s some cool use cases for Prometheus and Grafana that you might not have thought of:
Speedtest#
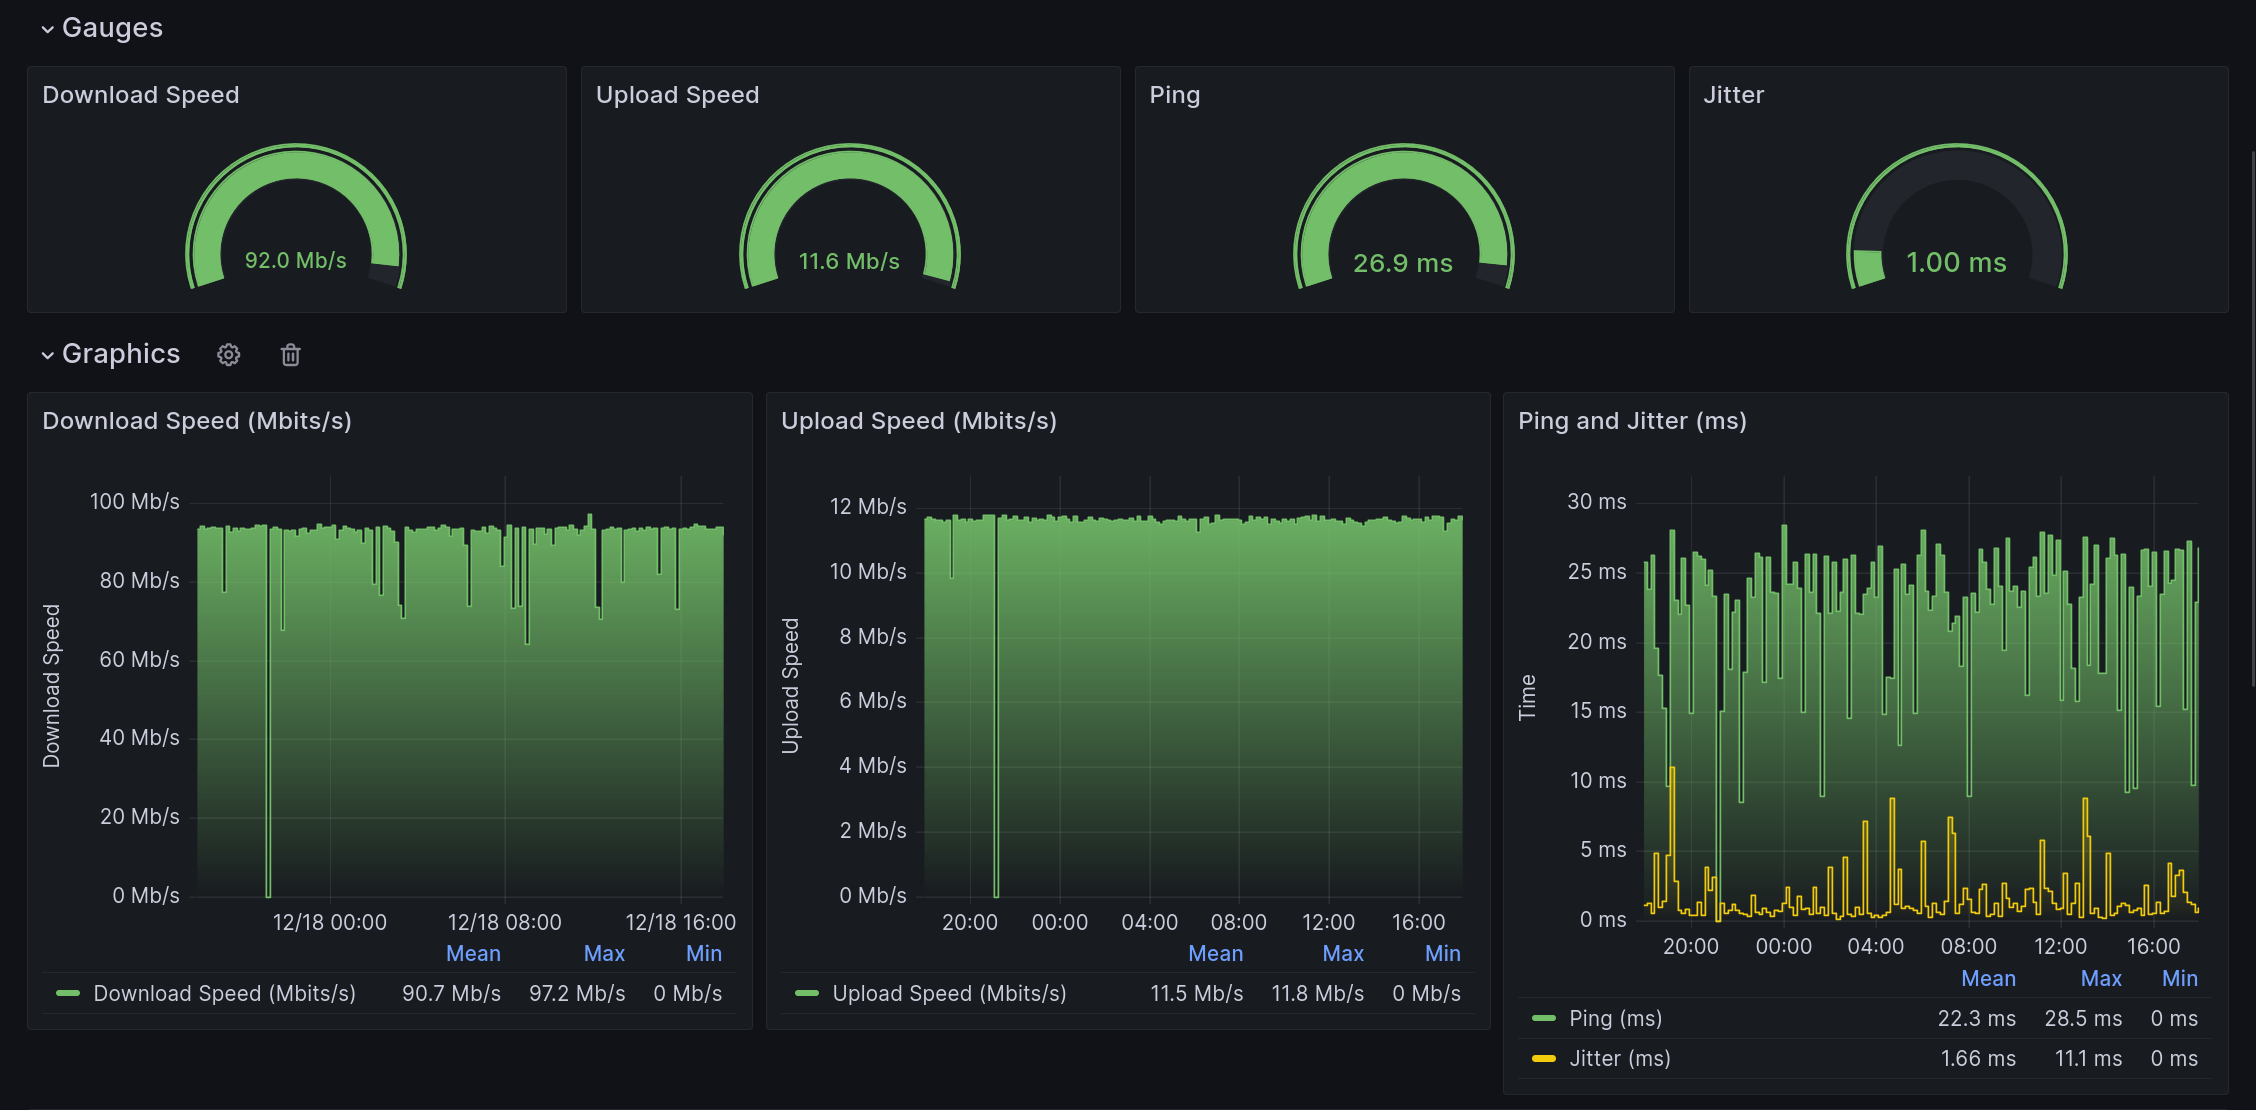
I run a speedtest every 10 minutes and store the results in a Prometheus time series database. Then I can visualize it in Grafana. It isn’t particularly useful but it’s fun. Here’s a screenshot of the dashboard:
Epic README.md#
Grafana has a feature where you can embed a dashboard as an iframe, so I thought it would be cool to have some live metrics on my README for the homelab. You probably know that GitHub supports inline images in its markdown, but unfortunately not iframes. But there is a Grafana plugin which can render a dashboard as an image (it launches a headless Chromium instance and takes a screenshot) whenever you hit a url. So I wrote a quick program to cache the image and re-serve it at another endpoint (invalidating every 5 minutes), so I don’t get a spike in CPU usage if too many people look at it at once or someone is DoS-ing me (Chromium is a heavy solution). It also makes response times very snappy. Anyways, I can embed that image into my GitHub readme and get a live dashboard without using any iframes!
Here they are:
Mail#
Yes, I am crazy enough to self host my own email. This is just for fun though and I don’t use it for anything important. Unfortunately the current landscape basically requires you to have and use Gmail if you want to guarantee that your emails arrive in the inbox of the recipient. I don’t want to miss out on an apartment because my email got marked as spam, or my home internet was out for a few minutes.
I use Simple Docker Mailserver to handle most the heavy lifting. Notably, I have a separate tailscale pod for this service because dovecot and postfix both natively support the proxy protocol, and specifically don’t work behind nginx which I use for most other traffic. I primarily use it for sending emails from my server, like Nextcloud login confirmations and such.
CDNs and this website#
Although I want to self host absolutely everything, I also think there are some cases where it is not appropriate. This website for example is statically built and fully public anyways, so I see no reason to use up my own bandwidth instead of a CDN. Right now it’s hosted on GitHub pages. I do self host Plausible for analytics though, so there is a little embed in the <head> of the page which sends out some basic site usage metrics. It’s done asynchronously so it doesn’t slow down the page loading time and it doesn’t increase latency for the client. So congratulations, if you’ve read this post you’ve talked to my home server!
Conclusion#
Well, that’s an overview of my homelab. I glossed over some details and skipped some things, so if you want to have a look at the code you can visit it here. If you found any of this rambling useful be sure to star the repo!